 Does the process of hanging your family portraits scare you?
Fear no more. Using the following basic designer tips will give you confidence that your display will not only hang securely, it will also add personality, warmth, and excitement to your bare walls.
Read on for tips on family portrait groupings, the easiest placement method, and how to properly hang your treasured portraits.
Family Portrait Grouping Tips
Groupings deal with number of portraits and their relation to the space.
- Related subjects grouped together are more interesting than random photos so pick a theme like family trips, children’s sports, baby’s first year, or ancestors.
- Determine how many photos are needed for the space and choose several of the best from your selected theme. Doesn’t matter if they are recent or old, color or black and white, kids or adults.
- Add emphasis using a variety of photos grouped together, such as surrounding a large graduation photo with smaller ones from different life stages to show how a child has grown. Hang family portraits in order of ancestors or descendants.
- Create unity with mats and frames in same color or style (not identical) that work with the room décor.
- Add photos of different sizes to create balance—symmetrical, asymmetrical or radial. Asymmetrical groupings require more thought but remain interesting longer.
Easy Portrait Placement Tips
Placement deals with how high and how close photos are when hanging:
- Space between each photo and space between photo display and surrounding area is important. Too close to each other looks cluttered. Too far apart looks desolate.
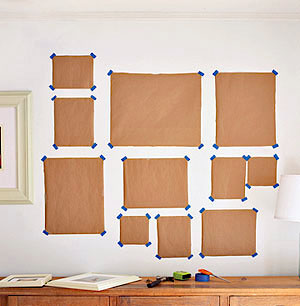
- Measure space to be used and determine number of photos that will fit.
- Trace each frame on Kraft paper, cut out, and mark hanger placement on paper.
- Begin by arranging on the floor leaving generous space between unframed pieces, closer for smaller pieces. Once arrangement is determined, use painter’s tape to adhere paper cutouts to the wall.
- Step back and view. Rearrange if needed then place hangers nailing through paper.
- For single images, hang at eye level using image center as reference point (not the frame) and just go straight to taping cutout on the wall.
How to Securely Hang Your Treasured Portraits
A safe, secure connection between photo and wall is top priority so portraits are easily seen but will not fall down with the slightest touch.
 On framed portraits or gallery wraps:
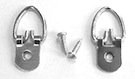
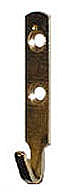
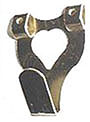
- Use solid brackets, D-rings, or triangular hinged loops instead of wire – brackets have a precise center; wires are inexact.
- Use two brackets, rings, or loops for stability – photo stays level if bumped.
- To hang straight, measure accurately – get exact distance between center of bracket, rings or loops and distance from top of each to edge of frame.
On the wall:
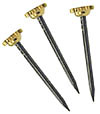
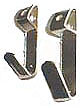
- Use flush wall hooks – J-shaped hooks with slender metal pins inserted at 45-degree angle designed to keep the nail in place, even in drywall.
- Use steel pins with a hardened shaft and large head that do not bend with weight.
- Use hooks properly weighted for photos you are hanging.
- Use security hangers for high traffic or areas needing extra safety. Frames don’t move unless released with a security key.
 |
 |
 |
 |
| J-Hook | Steel Hardened Pins | Medium Weight Hangers | Low Weight Hangers |
No formula or golden ratios to remember. Just follow these basic rules, grab a family member or friend for an extra set of eyes (and hands!) and watch your family’s eyes light up when they see the new photo gallery.